Wednesday, September 30, 2015

A Tutorial By Yours Truly.....


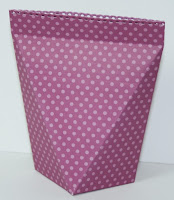
Howdy, Sweet Friends!  Today I have a tutorial to share that makes a nice little gifty pouch.  Fall just seems to be the perfect time for gift making and giving--isn't it?  The pouch is self opening and can hold any number of things.  It's perfect for sharing a treat with someone special!

To get started, you will need the following supplies:

Paper Trimmer/Scoring Tool
Cardstock/Designer Paper  6” x 8 ½”
Straight Edge & Pencil
Scissors
Decorative Edger Die or Punch
Adhesive

The steps are pretty easy, but accomplish a project with lots of WOW!
 Along the 6” side of the card stock/designer paper, score at 1” and 5”. 
Rotate the card stock and score at 4” and 8”.


Realign the card stock so that the left edge is at 2”.  Cut from the top of the card stock to the score line.  Repeat this one inch cut at 4” and 6”.

Make a similar one inch cut, using trimmer or scissors, on the opposite side of the card stock at the 4” (middle) mark. Trim the ½” panel you will use to close the pouch by angle cutting and removing each corner.


Using a pencil and ruler, lightly draw a diagonal line, in each panel, from the center cut line to each corner, as shown. 

 Score each diagonal line and crease it, as shown.

Trim top edge with an edge die, such as the one I've used from Bookmarks & More Dies.

Place adhesive on the ½” flap and join the sides of the pouch.

 Adhere the bottom flaps.
 
 The pouch opens when you squeeze the sides. 
Decorate and fill, as desired.
I used stamps from Sweet N Sassy Stamps to decorate my little pouch and filled it with cocoa.  Winnie's Warm Wishes and matching dies, are perfect for this time of year, for sure!  You can join Sweet 'N Sassy's Sweet Perks Club to get your own at a savings!!  What's better than that?

Make today a great one and, don't forget to be awesome!  TTFN-Jane


Monday, September 28, 2015

'Tis Fall Y'all!

Happy Monday, again, friends!  Truthfully, it isn't all that fally around here yet......the nights are cooler, but the days still feel all summery....errrg!!  I love the crispness of fall air, sweatshirts...and, no sweat...LOL!!

Nevertheless, I'm happy you stopped by for my Monday, I Brake For Stamps share.  My card today, features my most favorite leafy image called, Framed Leaf Foliage.  When you click on the I Brake For Stamps store link, you will see another card I created using this image.  It's a wonderfully versatile image and able to take on entirely different looks with your choice of different mediums.

For today's card, I stamped directly to kraft cardstock and then colored the image with my Primsacolor Pencils.  I often neglect these fabulous coloring sticks as I forget how beautifully they color and blend.  I added some white and gold shading around the image and the cardstock edges.  I also added some shading with Vintage Photo distress ink.  The whole card has a nice earthy feel.

When you shop IBFS, feel free to use my coupon code for savings SAVE10JANE

Go be awesome!  TTFN, Jane

Thursday, September 24, 2015

Sweet Black and White


I often find inspiration, like lots of you, on Pinterest.  Years ago, when I saw a project that I loved, I would search diligently to obtain the exact product used so I could completely copy the whole thing.  After many years of hoarding.......collecting, inspiration happens differently and I am always delighted when I am already set to go!  I love making the most of what I already have.  (ya, because I have SOOO much it's almost ridiculous!)

The original card, from which I drew my inspiration, was created using stamps from Hero Arts:
The image and sentiment I used both come from Technique Junkie Stamps.  I embossed both the Flourished Floral image and the So Sweet sentiment using white pigment ink and white embossing powder.  When embossing on black, I am always certain to use my embossing buddy to reduce random areas of powder cling---I hate that messy speckled look!

Like in the original, I added some multi-colored gems to contrast with the black and white simplicity of the image.  It's really a striking card, in real life!!  You should totally give it a whirl!!  You can pick up the Flourished Floral image from Technique Junkie Stamps and totally copy it OR find other fabulous images to use with the same concept. 

If you are in the market for some of the Technique Junkie CD's while you visit the store, be sure to use the coupon code  techniques at checkout to receive a 25% discount on all CDs!!  I own them all and they are all my favorite ;)

Go.  Be Awesome. TTFN, Jane


Tuesday, September 22, 2015

And It Goes On.....

Happy Tuesday, Sweet Friends!!  Thanks for popping by today!  I'm sharing a colorful birthday card I created using stamps from Sweet 'N Sassy Stamps!

It seems like there is always a birthday going on at our house.  There are seven of us, afterall, but we do tend to drag things out from time to time too!  In fact, today, we continue to celebrate our baby--who turned 7 (gasp!) on September 6th.  Her final gift happens today--an early release from school and a trip to Build-A-Bear......I know, don't be jealous!  LOL!!

I used this versatile birthday set, Birthday Bash, from Sweet 'N Sassy Stamps:
To begin, I started by stamping three of the verses, using Versa Mark ink, along the left hand panel of the base card stock.  I used the confetti image with clear embossing to create a resist before spraying on various dylusions sprays.  I love those sprays because the result is always vibrant and interesting.

You can fussy cut the balloons.....or....treat yourself to the matching die set, too:
Go ahead....you deserve it!
Be Awesome!  Jane


Monday, September 21, 2015

Enjoy Life

Happy Monday, Friends!!!  Today, be happy, enjoy life!!  What will you do today to make this sentiment a reality in your world?  I will create--choose one thing and make it happen!! 

I'm happy that you've popped by to see my weekly I Brake For Stamps share.  My project today is a clean and simple card featuring images from Alie Hoogenboezem de Vries's sheet over at IBFS, Full Sheet 150, and some Bisters!! 

I think this image could either be a fish or a bird--just another reason I love the versatility of this set!!  The images are so kitchy and whimsical--creativity is not hard to muster!  I chose bird for today....we all know about my bird thing so, I'll just leave it at that!

After grounding the image with a splattering of bisters, I added some distress ink around the edges and popped up the birdie image on dimensional tape.  The bird, I colored with distress inks, cuz they are currently my favorite! 

What are YOU working on?
Have a great day and don't forget to be awesome!  TTFN Jane

Wednesday, September 16, 2015

Color Blocking and Cardstock

Happy Wednesday, Friends! 

The other day, I had a pretty successful stamping time and played along with a few challenges from Splitcoaststampers!  Monday's challenge is always a technique based challenge.  I'm all about the techniques so, I thought I'd give it a whirl!  The challenge (TLC551) was to create a project using the technique called Color Blocking With Card Stock. I love using up scraps and this technique is perfect for that!!!  You can view the technique here and then, try it yourself!!

I like the darker colors against the white card stock.  I think it makes the technique piece pop even more!  My die is from Penny Black, Field of Dreams.  The sentiment that I used to tie it all together is from a wonderfully encouraging set from Sweet 'N Sassy Stamps called, Be Encouraged

So.....be encouraged.  And, crafty.  And, awesome!  TTFN--Jane

Tuesday, September 15, 2015

Best Wishes

Happy Tuesday, Sweet Friends!  I have a sweet little project I cooked up by combining a few recent challenges from Splitcoaststampers!  I found myself with some rare stamping time (lol....I'm such a liar!) and little inspiration so....what WAS a girl to do?

I actually do have little time to blog hop these days and tend to find most of my inspiration on Pinterest. I notice, often, references to the SCS challenges so, I thought why not give it a whirl?  It sure did help unleash some creative juices!  I almost abandoned the color challenge from September 8th---Blackberry Bliss, Tempting Turquoise and Pink Pirouette (CC547)???  Sounded a little too girly for me!  But, when I combined it with the sketch challenge (SC557) from September 10th, it practically made itself!  When you pop over to SCS, you'll find a gallery dedicated to each challenge--go check it out!

I had already been playing with this super amazing birthday set from Sweet 'N Sassy Stamps, called Birthday Bash--it worked perfectly for this project--what do you think?  As I was trimming my sweet little candy nugget, I was also sliding the matching die set into my shopping cart......shhhhhh ;)

Get inky and be awesome--TTFN, Jane

Monday, September 14, 2015

Enjoy Life...Believe In Love

Happy Monday!!  I had such an amazing weekend!!  Lots of kid time and fun activities!  I also spent some time in the Studio rearranging to make room for my new TREADMILL!!  I'm so excited to finally have one and I'm also loving the rearrange in my Studio!  It's so cozy, I really don't want to leave!  So, at least for awhile, I didn't!!!  I ended my weekend playing around with some fantastic stamps from I Brake For Stamps.  

I am so in love with this sheet of stamps by Alie Hoogenboezem de Vries!  I just cannot stop playing with it!!  You'll find it labeled in the I Brake For Stamps store as Full Sheet 150 (Don't forget to use my coupon code SAVE10JANE).  It is amazingly wonderful!!!  The images are adorable.....I love the sentiments running down the girls' arms!
I had some water color paper scraps sitting on my desk so, I decided to do some water coloring.  For ink, I used my distress markers--just colored a spot on my kraft sheet and picked up the color using my aqua brush.  It was fun and relaxing--the perfect way to end my weekend!
I created this colorful background, for my last card, by stamping the geometric shape image repeatedly and then colored in using the same distress markers and aqua brush.  The paper, however, is a matte finished card stock vs water color paper.  I love how deep the colors are and how different it looks just by changing the paper type.
Fun Stuff.
Be Happy.  Enjoy life.
Don't forget to be awesome--Jane

Friday, September 11, 2015

A New Release from Sweet N Sassy Stamps!


Happy Friday, Sweet Friends!!!  Today is release day over at Sweet 'N Sassy Stamps!  I'm excited to share some of my first creations using some of the new goodies!  You can read more about the full release on the Sweet 'N Sassy Blog.  There are so many fabulous new sets to choose from and, also, some new dies!  Even though I'm all about the fussy cutting, I do love me some matching dies!!  It just makes the finished project so much more polished!

I'm crazy excited about my first creation!  I've been dreaming of a project like this for years.  Sweet 'N Sassy's brand new Bible Journaling line is the exact spring board I needed to finally get moving on it!  I completely adore the idea of Bible journaling and have wanted to showcase my favorite verses in some way for years, but I still haven't wrapped my head around the idea of actually doing it in a Bible.  Altering this Rolodex is perfect for me--each card is it's own little project and feels much more doable to me.  Sweet 'N Sassy has so many wonderful stamps that make this project a dream!  For my first card, I used Words of Life: Common Words 1, Words of Life: Collection 1 and Floral Pattern Background.  On the backside, I plan to write/journal/stylize Isaiah 40:31 "those who hope in the Lord will renew their strength.  They will soar on wings like eagles; they will run and not grow weary, they will walk and not be faint."  I can barely wait to get started!

Another favorite sentiment of mine has always been "Wise Men Still Seek Him" so naturally, I was drawn to this beautiful set featuring the silhouette of the wise men.  We Three Kings also includes six sentiments--perfect for those Christmas cards I should get a move on!
 I created the purple background using various distress inks directly onto an acrylic block.  I misted the inks with water to blend and applied the block to white cardstock.  It's a fun, easy and colorful technique that can make quick order of your card making.  The second background was more time consuming, and truthfully, a bit of a flop!  The texture you see comes from goosebumps--but I'm not really sure why they took the color of the dylusions sprays I used over top.....I MAY have been a bit impatient with the drying process...idk, but it still looks kind of interesting so, I went with it!  I'm flexible like that--

I sure hope you are enjoying the hop and finding lots of inspiration!  The girls have really out done themselves, in my opinion :)

Have a great day being awesome!  TTFN, Jane


I got crafty with:


Thursday, September 10, 2015

Your Heart and My Heart.....

Happy Thursday, my peeps!!!  Thanks for joining me today for a Technique Junkie share!  I was immediately drawn to this Old Friend image from Technique Junkie stamps from the minute I saw it.  It perfectly captures that feeling I've been lucky to have a few times in my life---the knowing of somebody who so completely gets you. 

I saw this great little technique online (a Unity Stamps video) and wanted to give it a go.  I'm not really sure that it had/has an official name, so I'm referring to it as Tape Texture.  It maybe something that has been around since time began, but it was new to me so I feel kinda like a pioneer!  :)  It adds dimension and interest--which, like with your personality, is ALWAYS a good thing! 

I started with a precut tag and some masking tape.  After covering the tag with randomly sized bits of tape, I applied gesso to the whole thing.  When the gesso was completely dry, I added various distress inks to colorize and highlight the texture added by the tape.  I added my stamped image, Old Friend, over the top and let it dry completely.  When I got around to using the tag, I decided on a card, adding some extra hot pink ink (Pink Carmine, Faber Castell PITT pen, to be specific) around the edges to tie it to the base cardstock a bit more.  I created a background using panels of Sea Waves.  I like the contrast between the vintage image of Old Friends and the somewhat cartoony nature of Sea Waves---yes, that's a word!  I decided to stop apologizing for my sequin obsession.  I just got a HUGE mixed bucket of them so, they will be my go to for the next decade--at least.  It's better than those fancy cutting scissors.  The scattering a sequins was the finishing touch and really seemed to pull the whole piece together, as usual :)

Have a great day, and don't forget to be awesome!  TTFN, Jane

Thursday, September 3, 2015

Little One...

Happy September!  We are well on our way to bonfires, falling leaves, football and hot chocolate! I completely love this time of the year!  I'm currently ignoring the fact that it has been near 90 for the last two days and my air is still on---I will still shop for sweatshirts and warm socks!! 

So.....I've had this frame sitting in my Studio for....many years.  Yes, years.  It was super cheap, I got it at Target on clearance.  It had a few dings in it, but I forked over the $1.83 anyway and just knew it was going to be fabulous.  I've long forgotten the first idea I had all those years ago to transform it into something fabulous, but thought I'd have another go at it!  I sanded down the edges to "hide" the dings and poof! shabby artwork all set to go!

I decided to use the brand new set from Sweet N Sassy Stamps, Little One, to stylize the different sections of the frame.....I wanted to try a marbling technique I saw demonstrated by the fabulous Lydia from Understand Blue on Splitcoaststampers.  The technique utilizes a MISTI, but I don't have one....sniff...boo hoo!  The big selling point years ago, for clear stamps, was that you could see through them and thus, two (or three) step stamping would be a breeze!  So, I gave it a whirl....The marbling technique was done on the carriage image.  I layered three different distress inks on that particular image.  I like the dimension it adds and it was pretty easy to line it all up......I still might need a MISTI, though....

Don't forget to be awesome!

TTFN, Jane

Tuesday, September 1, 2015

Hippity Hop.....Technique Junkie September Blog Hop

It's hop time again!  Like a reward for getting those kiddos off to school.....just in the nick of time!!  Today, the Technique Junkie Designers are prepared to get you in the holiday mood!  If you've not come here by way of the hop, WELCOME!  But, please head to the beginning so you do not miss any of the inspiration!

If you've been hoping along, you have just left Beth Norman's blog.  She always does such amazing work....don't you agree? Makes me want to just go out and shop!!  Speaking of that, keep in mind that all of the September images are on SALE until September 8th!

My first card features a classic Halloween image, Black Cat......he looks so spooky!!  The sentiment, Fright Night is also part of the new release so, make sure to get them both!!  For my background, I paired the Leaf Repeat background stamp with a water coloring technique that smooshes color on using a craft sheet.

My Christmas card is a simpler, cleaner design.  The beautiful Ornament image is highlighted by a block of color created with distress inks.  The image itself is heat embossed in gold and then colored with distress markers.  The Merry Christmas sentiment is also heat embossed with gold.  Save for fussy cutting all of the ornaments, this would make a great card for the upcoming season!

Your next stop is Jerri's blog!  I think she is fantastic and soooooo creative!  I'm sure you will enjoy her inspiration!  TTFN--

Don't forget to be awesome!  Jane