Hello, Friends! I have a fancy fold card/booklet to share with you for our July Friends of Unity Blog Hop! Our prompt for this month is Technique. I’ve lately been digging different booklets and fun folds. I saw this one in an Instagram reel (sorry, can’t recall the original poster) but the directions were unclear and incomplete. I swear I watched that reel 20 times before I figured it out! All products used, generally can be found in the Unity Stamp Co store (one or two might be retired).
Be sure to tag me if you make your own—I’d love to see what you make 😊

Supplies: 12 x 12 cardstock, paper trimmer, scoring tool and circle punch (optional)
Step One: Score 12 x12 paper in half at the 6" mark; rotate the paper and score again at 4" and 8". Without changing the paper's orientation, trim 1/8 " from the edge of the cardstock.
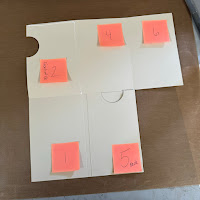
Step Two: Cut along the 6" score line, from the 4" score to the end of the paper. (I've used post it notes to number the panels to bring clarity to the remaining steps.) Using the photos as reference, fold the paper over so that the even numbered panels are folded over the odd numbered panels.
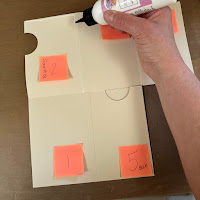
Step Three: Fold over panels 4 and 6 as shown (to get them out of the way) so you are able to create the back cover pocket, using panels 3 and 5. If desired, cut a half circle notch on the top of panel 5; glue the edges of panel 5 to panel three.
Step Four: Next, you will join panels 1 and 2 to create the front cover pocket. You will notice in the photo that only panel 2 is notched. In my final project, both 1 and 2 are notched--just a little creative glitch 😊 Place glue along the edges of panel two and fold over to adhere to panel 1. The top view photo shows the base of the project complete.
The completed project:
Please visit my Instagram @stampymom5 to see my quick flip through reel when you have time. Thanks so much for stopping by! If you haven't, but want to start at the beginning of the hop, visit Crystal's Blog. To continue along the hop, the next stop is Tammy's Blog.
ENJOY!
ttfn--Jane


Oh my goodness, Jane, this is amazing! I love that you shared a photo tutorial!! I definitely plan to come back and follow your tutorial to make one of these. I do wonder if I have 12 x 12 paper... hmmm. Thank you SO much for sharing this amazing fun fold booklet!
ReplyDeleteJane, this is fantastic, and so beautiful! I hope to try this soon.
ReplyDeleteFabulous tutorial- can't wait to try it
ReplyDeleteOh my, this is a creative booklet. Love all of the pretty details and texture.
ReplyDeleteThe previous comment is from me as I forgot to login. I love the pretty booklet details and texture, Jane. :)
ReplyDeleteWhat beautiful card creations Jane. This is Kari B. What a great fold technique. I will be following to view your tutorial 💛
ReplyDeleteJane this is so awesome!!! Love all your makes. Tammy H xo
ReplyDeleteA lovely project and beautifully done
ReplyDeleteStunning project!
ReplyDeleteKaren Adams
Fabulous project, so many pretty details!
ReplyDeleteOh how fun this
ReplyDeletelooks! Love new
Ways to make things.
Carla from Arizona
Wow, Jane! This is so gorgeous! Love, love, love it!
ReplyDeleteLove all the fun elements you pack into a card. Lovely and a fab technique.
ReplyDeleteWOW Jane!! This is amazing!!! So much detail and depth to this project!!
ReplyDeleteThanks for sharing step by step how you created this!
ReplyDeleteThanks for the process, tips and technique. Just amazing and so beautiful. Thanks for the inspiration!
ReplyDeleteWhat a wonderful booklet and I love the stamps you chose to include.
ReplyDeleteBeautiful booklet project! Love the tags to tuck inside and all the pretty images you used!
ReplyDelete